Central venous catheter placement has become a routine procedure due to its numerous indications: it facilitates resuscitation, nutritional support and long-term vascular access.
Channeling is usually carried out under ultrasound guidance because of the great advantages it provides, with this tool it allows us:
- Choose the optimal target vessel for a successful clinical outcome.
- Perform an examination prior to cannulation which allows to determine associated complications or the presence of the healthy vessel prior to cannulation and its characteristics.
- Increase the success rate during vascular cannulation.
For all these reasons, today ultrasound-guided access is the standard of care for central venous access.
TWO ESSENTIAL PHASES IN CENTRAL VENOUS CANNULATION
- Pre-procedural exploration, which will allow us to observe the possible anatomical variants and which will be necessary to determine the most appropriate central venous access for which we will opt.
- Cannulation technique itself.
IDEAL CHARACTERISTICS OF A CENTRAL VENOUS ACCESS
According to the Spanish Society of Pediatric Intensive Care, the ideal characteristics of a central venous access are as follows:
- Possess the largest possible caliber.
- Low variability of diameter with respiration.
- Low risk of mechanical complications.
- Lower risk of infection or catheter thrombosis.
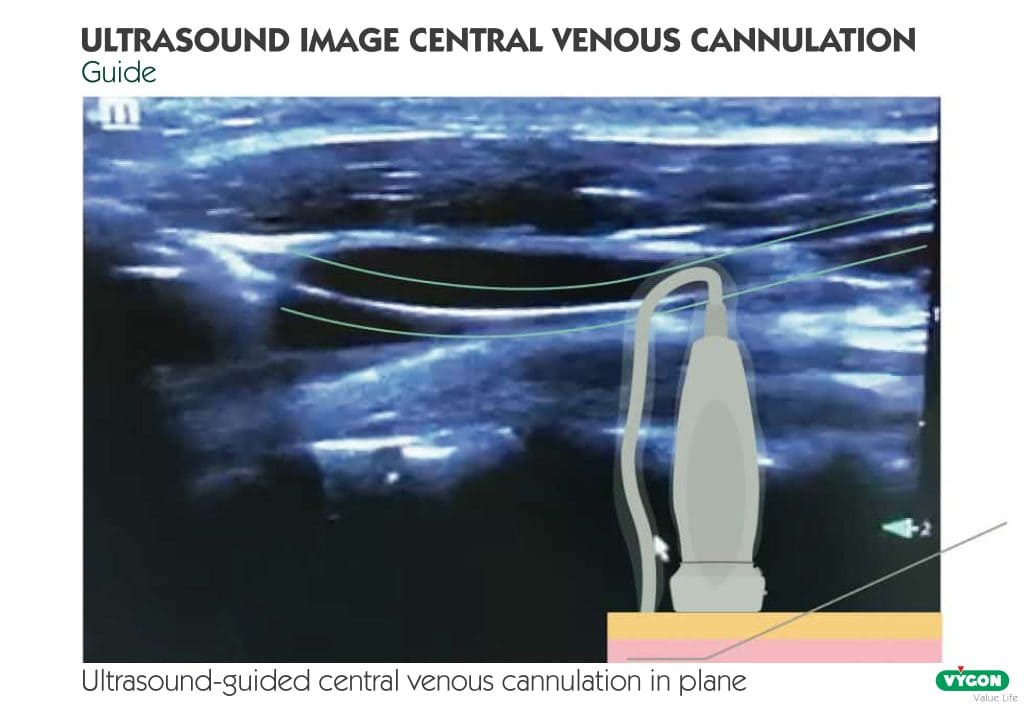
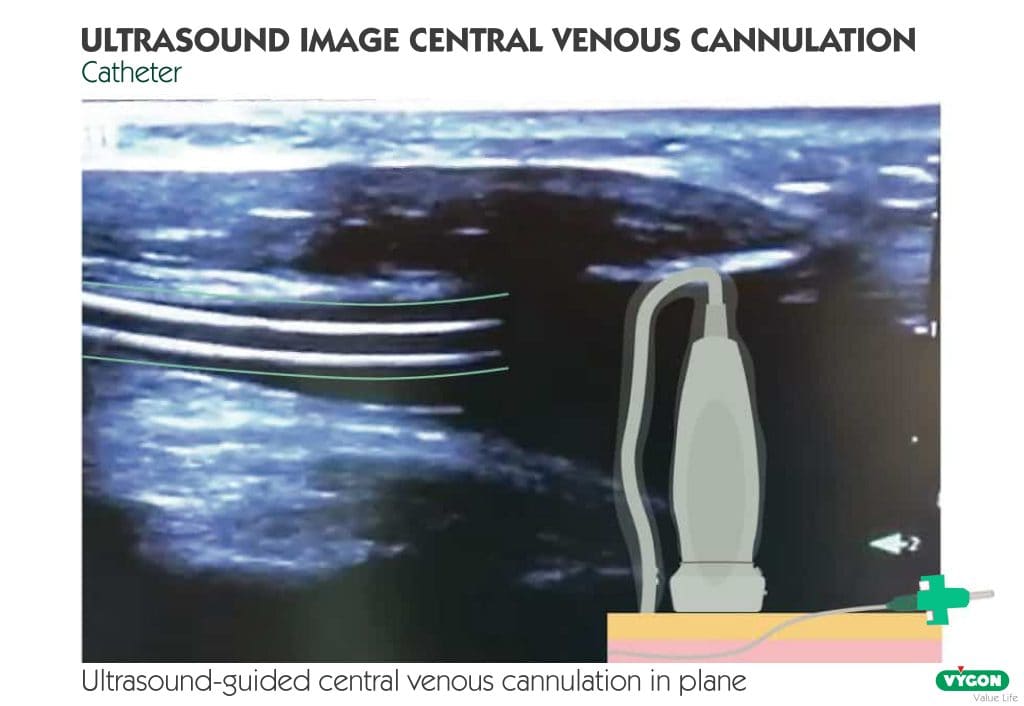
- Feasibility of ultrasound cannulation in plane.
- Comfortable exit site for the patient and for the manipulation of the catheter by the staff.
- Easy to learn and with a high success rate.

STERILE FIELD ASSEMBLY
Once we have decided which vein to cannulate, it is time to prepare the work site and the patient.
- The patient will be optimally positioned and monitored. Since we are dealing with a pediatric population, this technique is usually performed under general anesthesia or inh sedation.
- Place the ultrasound machine in line with our position, as explained in previous sections.
- Clean the patient’s skin with antiseptic solution.
- Wash hands and dress with sterile gown and gloves.
- Spread the sterile cloths to cover the entire surface.
- With the help of another person we will cover the ultrasound probe with a sterile sheath. Previously we will lubricate the probe with gel (sterile or not depending on the help we have) and then we will introduce it in the sterile bag adjusting the rubber bands of the kit to the base of the probe.
- Finally, we will fix the probe cable on the sterile field with some adhesive to avoid inadvertent falls.

CHANNELING OF THE CENTRAL ELECTION ROUTE
Once we have the material open:
- Start flushing the catheter system with sterile saline solution until the saline refluxes from the catheter tip.
- We will leave the lumen closed with the clamp, except for the distal lumen.
- Remove the guide sheath and check that it slides properly.
- Fill a syringe with sterile saline and connect it to the 20-24G abocath.
- We place sterile gel to improve the skin-probe interface outside the ultrasound sheath.
- We place the probe on the patient’s skin with a longitudinal or transverse arrangement depending on the vein to be cannulated with the non-dominant hand.
- Once the venous image is centered in the center of the screen (transverse plane) or along the screen (longitudinal plane), we take the syringe with the needle with the dominant hand and at an angle of 45 degrees we incise the skin at the level of the central marking (out-of-plane approach) or on one of the sides of the probe (in-plane approach), always under direct vision and in real time of the needle in the ultrasound.
- As we advance we aspirate until we see that the needle penetrates the vessel (ultrasound control) and dark blood flows easily through the needle.
- Release the ultrasound machine and fix the needle with the non-dominant hand.
- With the dominant hand we remove the syringe and introduce the guidewire through the needle with a sliding movement and always leaving a free tip.
- Once the guidewire is inserted, we can release the non-dominant hand and check longitudinally the presence of the guidewire inside the vascular lumen ultrasonographically. If the wire is inside, we continue with the procedure always under electrocardiographic surveillance to detect possible arrhythmias that would require the wire to move backwards.
- Using the Seldinger technique, the catheter is slid through the guidewire en bloc to avoid kinking. Once we see that the guidewire comes out over the free edge of the catheter lumen, we introduce the latter at the desired distance and remove the guidewire.
- After removal, a syringe aspiration of all the lumens is performed to check patency. If they are permeable, the lumen is cleaned with sterile saline or diluted heparin according to protocol and the lumens are closed.
- Finally, the edges are sutured to the skin with 3.0 nylon to avoid accidental tearing, the surface is cleaned with antiseptic solution and covered with a sterile dressing.

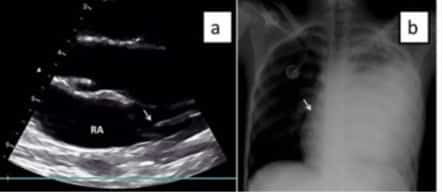
After cannulation, the location of the catheter tip should be checked either by thoracic radiography or ultrasound (more indicated in the case of children), as well as the presence of possible complications (pneumothorax, pericardial effusion, etc.).
ULTRASOUND MONITORING OF THE CENTRAL LINE CANNULATION: POSITIONING AND POSSIBLE COMPLICATIONS.
VERIFICATION OF THE POSITION OF THE GUIDE
Ultrasound confirmation of the position of the guidewire is a technique available to all departments, is easy to perform and does not require specific training. In addition, unintentional arterial puncture and dilatation remains a major problem that can lead to significant morbidity and even mortality, a complication that we can reduce and even eliminate by ultrasound verification.
Ultrasound confirmation of the position of the guidewire within the vein prior to dilatation can help prevent and even eliminate this complication.
The position of the guidewire is performed once the guidewire is inserted and can be rechecked after insertion to ensure that it has not kinked, punctured the vessel or cannulated an unwanted vessel (especially in cases of upper trunk access).
To do so, we place the probe in longitudinal plane over it.

VERIFICATION OF CATHETER TIP POSITIONING
This check is extremely important since an intracardiac or too high location can have serious consequences for the patient. The location of the catheter tip can be checked either by radiographic control or by venous pressure waveform control.
The ideal location of the catheter tip in the case of cannulation at the level of the upper trunk would be in the lower third of the superior cava, while for those cannulated in the lower trunk it would be at the level of the cavo-atrial junction.
Either a linear or a 2-6 MHz convex probe can be used for this scan.
First, the intracardiac position must be ruled out. To do this, the probe is placed in the subxiphoid window to obtain a four-chamber plane of the heart. From this plane it can also be visualized if the catheter tip is located at the level of the cavo-atrial junction. If the catheter is not seen at the cardiac level and the tip is seen at the level of the superior cava or cavo-atrial junction -for those of inferior location- it is considered that the catheter is normo positioned.
In the event that the tip of the catheter is not visualized in the superior cava from subcostal, it would be passed to a right parasternal or supraclavicular plane and if it is not located at that level, it is considered that the catheter is poorly positioned.
A place to learn about health procedures and techniques from leading professionals.