Executing Arterial Cannulation with Precision and Confidence
Arterial line insertion is a high-skill procedure that demands both technical precision and clinical awareness. Whether you’re using the direct puncture method or the Seldinger technique, success hinges on preparation, sterile technique, and a structured approach. In this section, we walk through the whole insertion process—from setup to documentation—highlighting best practices and safety tips.
Reducing Pain During Procedures
Several techniques can be used to help to reduce the pain of the procedure. Helping the patient to relax can lessen the awareness of pain.
Local Anaesthesia
Local anaesthetic should be infiltrated subcutaneously around the site of cannulation immediately before insertion of the arterial cannula. Lidocaine is the most frequently used injectable local anaesthetic and comes in
different concentrations (0.5%, 1% and 2%). 1% or 2% can be used for arterial line insertion.
There are potential risks of local anaesthesia, including:
- Allergic reactions, including anaphylaxis
- Inadvertent injection into the vascular system
- Obliteration of the artery
Despite the use of local anaesthesia, the insertion of an arterial catheter can be an uncomfortable or painful procedure. The patient will often experience a significant amount of pressure, so psychological support is important.
Two Techniques, One Goal: Safe Access
There are two primary methods for arterial line insertion:
1. Direct Puncture Method
- The catheter is advanced directly over the needle into the artery.
- Limitation: Higher failure rate due to difficulty advancing the catheter, even with flashback.
2. Seldinger Technique (Preferred)
- A guidewire is inserted through the needle, followed by the catheter.
- Benefits: Higher success rate, longer dwell time, and reduced trauma.
💡 Use the Seldinger technique for patients with difficult access, paediatrics, or those requiring long-term monitoring.
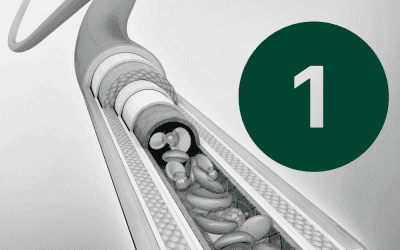
The Seldinger Approach
1. A needle gains access to the artery, confirmed with flashback
2. A wire is inserted through the needle, maintaining the arterial access,
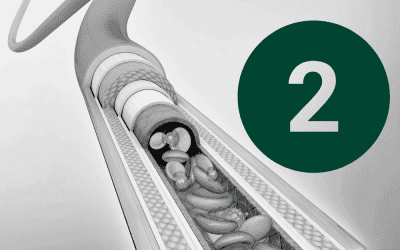
3. The needle is removed
4. The catheter is threaded over the wire into the artery lumen
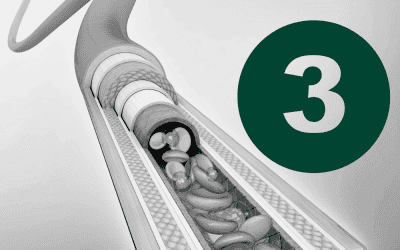
5. The wire is withdrawn.
The Seldinger technique should be used for the following patients:
- Those with a history of difficult access
- Those with anticipated difficult access. Paediatric patients due to a higher rate of artery occlusion influenced by repeated puncture attempts
- Those who require long-term access.
Step-by-Step: The Seldinger Technique
🧰 Equipment Checklist
- Absorbent pad for under limb
- Clean dressing trolley
- Gown
- Sterile dressing pack
- Chlorhexidine 2% (or alternative for those with allergy)
- Lidocaine or alternative local anaesthesia
- Sterile gloves
- 18 gauge blunt fill needle for withdrawing lidocaine
- 25 gauge needle for injecting lidocaine
- Suture or purpose made suture-less securement device
- Ultrasound probe (if used)
- Transparent semi-permeable dressing
- Syringes
- Arterial line
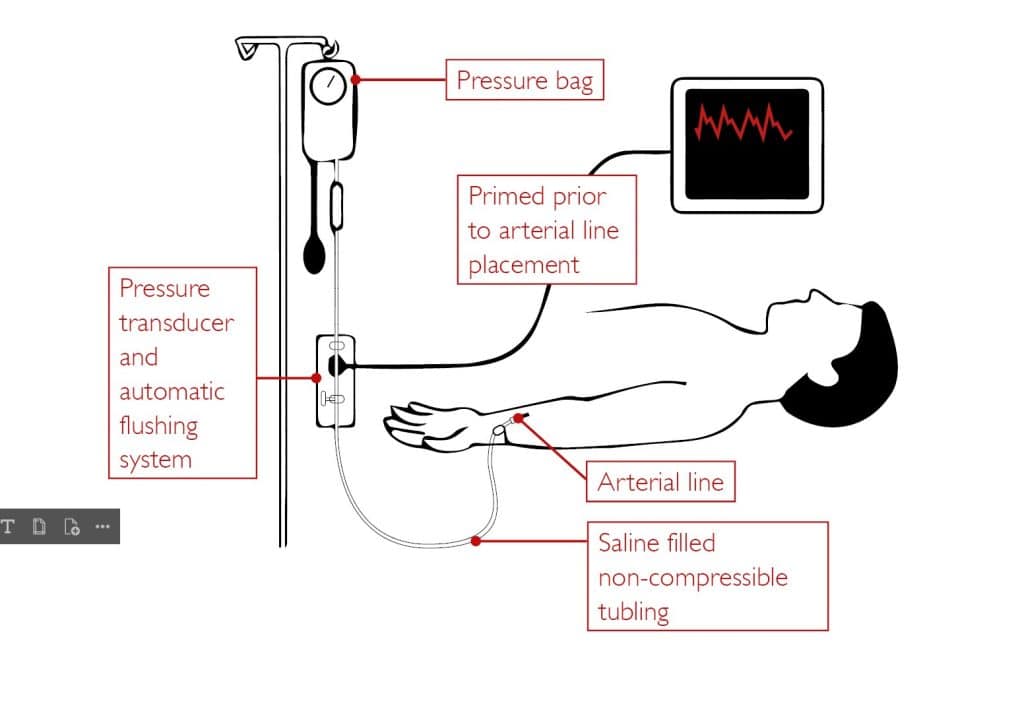
- Arterial line tubing (red line as an aid to identity), connected to three-way taps, transducer and pressure bag and flushed through
- Bag of 500ml 0.9% saline in a pressure bag, inflated to 300mmHg
- Three-way taps
- Transducer
🧪 Patient Preparation
- Introduce yourself
- Verify patient identity
- Assess patient, including drug allergies, current blood counts and past medical history
- Explain the procedure and gain consent
- Palpate the radial artery and check the collateral circulation
- Position the patient’s wrist by hyper-extending the wrist.
🛠️ Insertion Procedure
- Complete patient assessment and gain consent
- Set trolley using sterile technique
- Assess patient and choose an adequate insertion site by palpation and with the use of ultrasound
- Position the patient’s wrist by hyper-extension
- Wash hands
- Put on sterile gloves
- If using ultrasound, prepare the probe. Squeeze sterile gel into the base of the sterile cover and ask assistant to drop the probe inside
- If using local anaesthetic, place the 18G needle onto the syringe
- Withdraw lidocaine from vial. Remove the 18G needle and replace it with a 25G needle
- Clean the insertion site with chlorhexidine and allow the solution to dry
- Prime the 25G needle with the lidocaine and infiltrate the subcutaneous tissue around the proposed site of entry
- Palpate the artery; ensure the bevel of the needle is facing up. With the needle directed proximally, puncture the skin at approximately 30-degree angle
- Slowly advance the needle until flashback is noted
- Reduce the angle between the needle and the skin to about 20 degrees. Advance the guidewire into the artery. There should be no resistance when the wire leaves the needle. Never force the wire and never withdraw the guidewire back through a needle once advanced
- Hold onto the guidewire as you remove the needle
- Whilst maintaining contact with the guidewire, thread the catheter over the wire and use a gentle rotating motion to advance the catheter all the way up to the hub
- Remove the guidewire
- Ensure the arterial line tubing is flushed through and free of air bubbles.
- Connect the arterial line tubing to the catheter and secure it tightly
- Flush the catheter to ensure patency and observe the arterial waveform on the monitor
- Secure the catheter in place and apply transparent dressing
- Clean up the tray, disposing of sharps and dirty gloves appropriately
- Record the procedure in the patient notes.
Maintaining Aseptic Technique
Use Aseptic Non-Touch Technique (ANTT) throughout the procedure. For Seldinger insertions, a surgical ANTT approach is required, including sterile gown, gloves, and drapes.
Zeroing the Transducer
Prior to documentation, the arterial line needs to be calibrated. To do this, the line needs to be zeroed. Zeroing is required immediately after insertion and if there are issues with the reading of the arterial wave form.
To zero the line:
- Place the transducer at the same level as the phlebostatic axis
- Open the transducer stopcock to measure atmospheric pressure
- Press Zero button on the monitor.
Documentation Essentials
Accurate documentation is crucial for ensuring patient safety and providing legal protection. You should record:
- The artery accessed
- If ultrasound was used
- Skin decontamination used
- Ease of insertion or complications encountered
- Number of attempts
- Device information
- Number of attempts to successful insertion
- Device information.
Conclusion
Mastering the insertion technique is about more than just getting the line in—it’s about doing it safely, efficiently, and with full clinical awareness. By following a structured approach and maintaining a sterile technique, clinicians can reduce complications and ensure high-quality care.