Protecting the Line—and the Patient—After Placement
The work doesn’t end once the arterial line is in place. In fact, the post-insertion phase is just as critical as the insertion itself. Proper care and maintenance are essential to prevent complications such as infection, occlusion, or dislodgement. And when the line is no longer needed, safe removal ensures patient comfort and minimises risk. In this final article of the series, we explore best practices for maintaining and removing arterial lines.
Post-Insertion Monitoring: What to Watch For
Once the line is secured, regular monitoring is essential. Clinicians should assess:
- Limb perfusion: Check for cyanosis, cool skin, sluggish capillary refill, or decreased pulse.
- Signs of displacement: Swelling, bleeding, loss of waveform, or fluid leakage.
- Signs of infection: Redness, pain, pus, swelling, or fever.
💡 The insertion site should always be visible and inspected at every shift change.
Dressing and Site Care
A well-maintained dressing protects the site and reduces infection risk. Follow these principles:
- Use transparent, semi-permeable dressings to allow visual inspection.
- Change dressings when:
- Soiled or loose
- Integrity is compromised
- Cannula is kinked underneath
- Use an aseptic non-touch technique (ANTT) during dressing changes.
- Secure the catheter with sutures, steri-strips, or a suture-less securement device.
Maintaining Catheter Patency
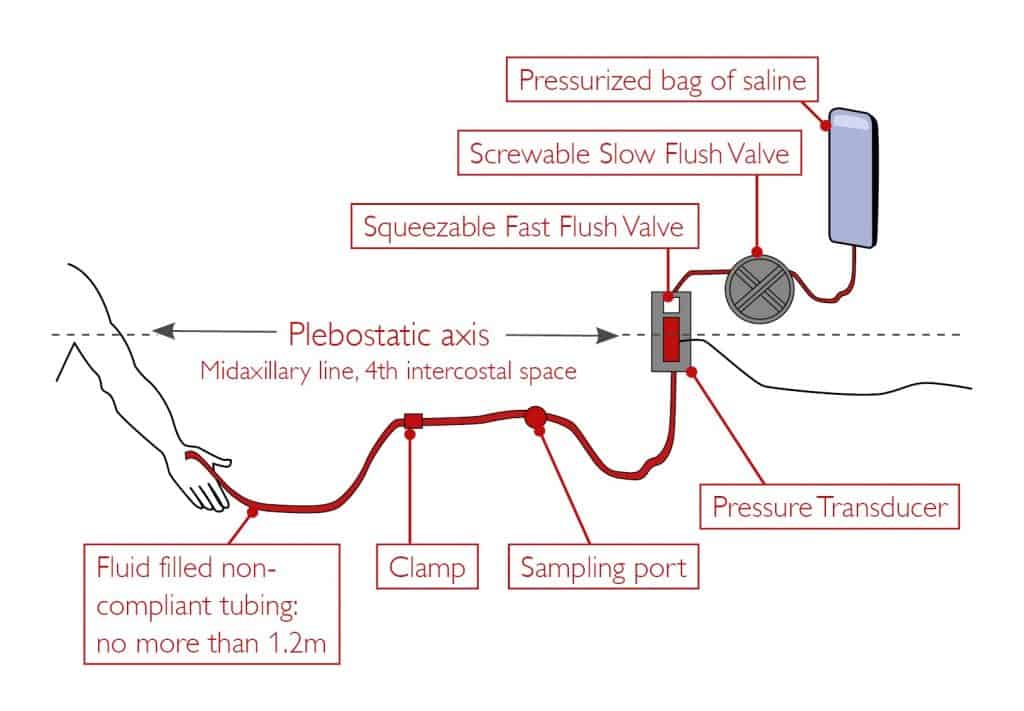
A pressurised intravascular infusion is required to maintain arterial line patency.
- Administer a continuous infusion at 0.5-2mls/hr either via a pressure bag
- Infusion solutions should be with 0.9% sodium chloride (INS 2016)
- Do not use infusion solutions containing glucose
- The infusion pressure should be higher than the intra-arterial systolic pressure. It is usually maintained at 300mmHg
- Manual flushing of the intra-arterial administration set should be kept to a minimum
- Always fully flush the line after blood sampling until no blood is visible at the hub
- The administration set should be changed every 96 hours or when clinically indicated
- Minimise the number of manipulations of the system
- Minimise the number of devices (such as three-way taps) inserted into the system
- Use a closed system to reduce blood loss and risk of bloodstream infection
- Only use specific arterial line tubing (with a longitudinal red line) to aid identification. This also has the correct pliancy to achieve critical damping.
Safe Removal: When and How
Devices should be removed as soon as they’re no longer required or if they are causing the patient harm (Loveday 2014). Only competent practitioners should remove arterial lines. The procedure should be explained to the patient, and their consent gained. It is important to check the most recent coagulation blood tests prior to removal. Patients with abnormal results or pre-existing severe clotting disorders may require infusions before arterial line removal.
Arterial lines should be removed when:
- No longer clinically necessary
- Signs of infection or occlusion are present
- The patient’s condition improves, and invasive monitoring is no longer required
🧰 Equipment Needed:
- Dressing trolley (cleaned, with disposal bag attached)
- Plastic apron
- Non-sterile gloves
- Sterile basic dressing pack
- Stitch cutter (if required)
- Transparent, semi-permeable
🛠️ Removal Procedure:
Patient Preparation:
- Check patient identity
- Check patient coagulation status
- Explain procedure
- Gain consent.
Prepare Trolley:
- Wash hands with soap and water
- Open sterile pack onto clean trolley
- Drop all necessary equipment onto pack.
Remove Old Dressing:
- Decontaminate hands with alcohol rub and put on non-sterile gloves
- Loosen and remove all dressings
- Remove using ANTT and avoid touching the insertion site.
Clean Site:
- Place sterile wrapping of the dressing out as the sterile field
- Clean exit site with skin cleaning solution
- Allow the site to completely dry.
Removal Process:
- Cut retaining sutures if present
- Position the sterile gauze just above the insertion site
- Slowly withdraw the arterial catheter
- Using the sterile gauze, immediately apply pressure for up to 5 minutes
- Apply a sterile dressing or pressure dressing over the arterial line site.
💡 If infection is suspected, send the catheter tip for culture.
Documentation Checklist
After removal, document:
- Date and time of removal
- Reason for removal
- Condition of the site
- Any complications
- Patient response
- Actions taken (e.g., culture sent, pressure applied)
Conclusion
Post-insertion care and safe removal are vital components of arterial line management. They protect the patient from avoidable harm and ensure the benefits of arterial monitoring are not overshadowed by preventable complications. With vigilance, skill, and adherence to best practices, clinicians can close the loop on safe and effective arterial cannulation.
Thank you for following the Mastering Arterial Line Placement series. If you’d like a compiled version of all seven articles in PDF format, you can download it below.