Insertion of central venous lines is becoming more commonly undertaken by specialist nurse-led units[1],[2]. To reduce complications, it is imperative these are only placed by experienced, trained and competent operators[3], [4]. Most guidelines now advise that, in all cases of CVC insertion, the use of ultrasound is beneficial, decreasing the risk of complications on insertion[5], decreasing the number of needle punctures, complications, and subsequently increasing insertion success rates4.
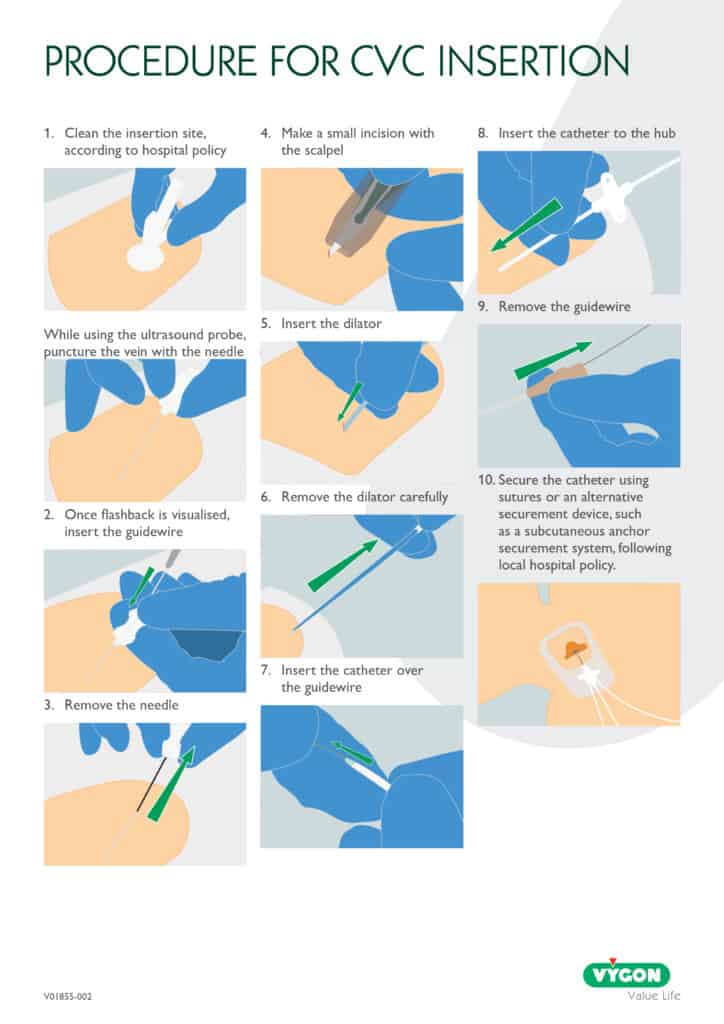
CVC Insertion Technique – Seldinger Technique
There are several different methods of central venous line placement. In all cases, the vein of choice is directly punctured and the skin entry site dilated to allow easy insertion of the device. To ensure the procedure is as pain free as possible adequate anaesthesia is necessary. Using a Seldinger Technique, CVC insertion can be performed with ultrasound guidance, which comes strongly recommended, or with a landmark technique[4],[6],[7].
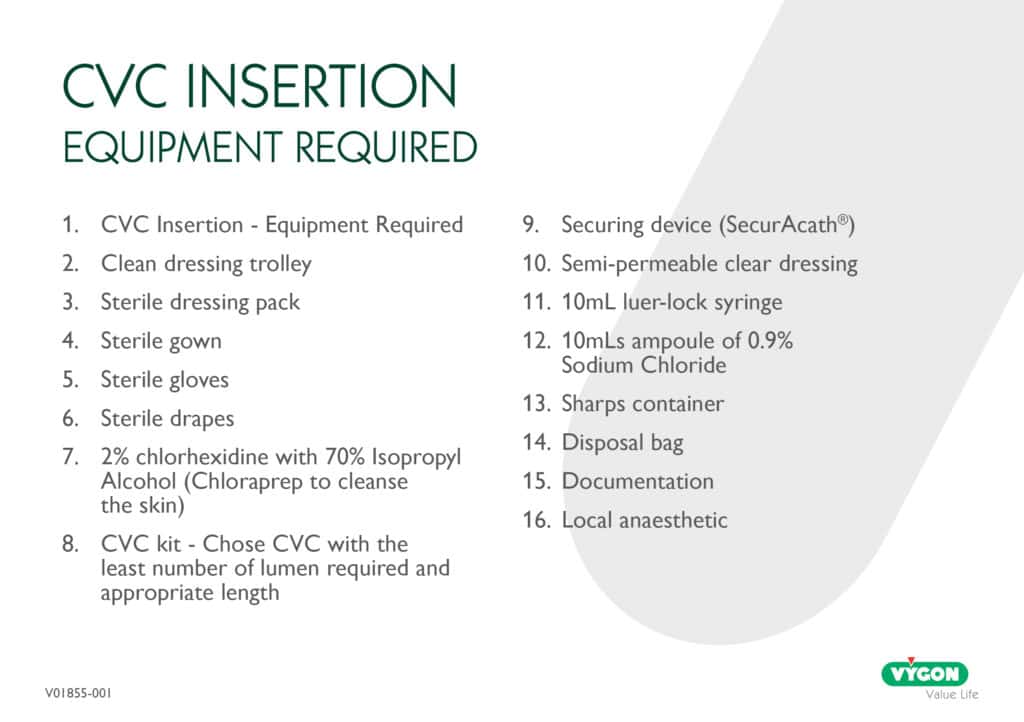
Central Line Insertion
Trolley setting and scrubbing up
The trolley will be cleaned with alcohol and set using a surgical ANTT®. Hands will be washed using a surgical scrub technique and in accordance with the infection control manual. Wear a scrub suit, theatre gown and sterile gloves, hat and mask[8]. Consider the use of standard CVC insertion packs.
Patient positioning
The patient should lay flat on a bed, trolley or theatre table. The head should be tilted down about 15-30° in Trendelenburg position. This will allow good vein filling and help prevent air embolism. Arm boards should be used where available. No patient should be left unattended on the table or trolley.
Monitoring
All patients should have blood pressure, pulse, oxygen saturations and ECG recorded during the procedure. If awake, inform the patient that this is routine.
Cleaning and draping
The target vein should be identified prior to cleaning and draping the area. The patient’s neck and upper chest are cleaned using chlorhexidine 2% in 70% alcohol for 30 seconds. This must be left to dry fully to ensure effectiveness. A fenestrated drape is placed over the patient allowing access to the access site. The patient should be completely draped to help prevent infection during insertion[7].
Locating target vein
The three central veins most commonly used for catheter insertion are the femoral vein, the internal jugular vein, and the subclavian vein.
Ultrasound guided puncture
Ultrasound guidance should be considered for all CVC insertions8. The veins can be easily identified and assessed. Visualise the target vein on the right-hand side and checked for size and patency. If the vein is too small, or appears thrombosed, the left side should be checked. Using light pressure with the probe on the skin, observe how the vein is readily compressed whilst the artery remains patent.
Landmark technique
If ultrasound is not being used, determine the vein into which the catheter will be inserted using external landmarks.
Internal jugular vein
For access via the IJ the most popular method is the “median” approach. The key landmark is the apex of the triangle formed by the sternal and clavicular heads of the sternocleidomastoid muscle. When the patient’s head is turned away from the insertion site, this triangle becomes relatively easily identified. The needle is inserted at the apex at an approximately 30-degree angle with the skin and is directed toward the ipsilateral nipple.
Subclavian vein
The subclavian veins lie just beneath the clavicles but cannulation of this vein is associated with complications. The most commonly used approach to the subclavian is the so-called infraclavicular approach. The insertion site is the junction of the distal and middle thirds of the clavicle. This site should be approximately 1cm from the lateral border of the clavicular head of the sternocleidomastoid. The needle is inserted into the skin and the tip is directed toward the sternal notch. The needle is then guided beneath the clavicle while still directed toward the notch.
Femoral vein
To identify the correct site for femoral insertion, identify the arterial pulse 1 to 2cm distal to the inguinal ligament. A towel roll placed beneath the ipsilateral buttock can improve exposure. The correct site for insertion is 1 to 2cm medial to the femoral arterial pulse. The needle is directed along the course of the vein and at a 45-degree angle to the skin.
Administer adequate local anaesthetic
Local anaesthetic dosage should be tailored to the patient’s response and the site of the administration, using the lowest effective concentration. Administer the anaesthetic via slow subcutaneous injection at a 45° angle to the dermis, allowing 60–90 seconds for the initial effect. Continue injecting through areas already affected by the anaesthetic. Always aspirate between each injection to check the needle is extra vascular. Local anaesthetic is administered via a needle to the patient; this needle is then changed for deeper infiltration.
Identifying and targeting vein using ultrasound
Cover the ultrasound probe with a sterile sheath filled with gel, smoothing out any wrinkles or bubbles over the acoustic window with a gloved finger. Apply sterile gel to the sheath. Stand behind the patient’s head and position the probe transversely on the neck, maintaining light, steady contact to avoid vein collapse. Scan the vein until it is seen at its maximum diameter and/or at its greatest separation from the carotid artery and then centre it on the screen. In conscious, cooperative patients, a Valsalva manoeuvre can enlarge the internal jugular vein and ease puncture. This is explained to the patient as holding their breath while straining a stool.
Centre of probe = Centre of screen = Centre of the vein.
Puncturing the vein
Draw up about 4ml of saline into a 10ml syringe and attach a 19g needle. Insert the needle tip in the incision, just beneath the skin, then angle the needle shaft upward. If using ultrasound, focus on the screen and watch for the needle’s tip (a bright white mark). Draw on the syringe plunger and, with constant aspiration, advance the needle with a short, controlled movement. Be careful not to plunge too deeply, or quickly as the anterior aspect of the vein lies barely a centimetre under the skin.
As the needle advances, the anterior vein wall will deform and invaginate springing back as it’s punctured, while blood is aspirated into the syringe. Note that advancing too slowly risks a double-wall puncture as the vein walls may compress together before puncture takes place, resulting in needing to withdraw the needle into the lumen of the vein (seen as an upward tenting of the posterior wall). Once in the vein, support the syringe/needle with your dominant hand, then with your non-dominant hand set down the probe, and return it to remove the syringe and insert the guidewire.
Inserting the guidewire
The J tip of the wire should be straightened using the scud. Gently bring the needle down towards the head, and whilst holding the needle steady gently insert the wire. If there is any resistance do not force wire instead remove the wire and check, you are still in the vein by reattaching the syringe and aspirating. Changing the angle of the needle may also help. This is an appropriate moment to use screening if available. The wire should be inserted into the SVC. Keep an eye on the ECG monitor at this time, as it will show ectopic beats if you have advanced the wire too far. The needle should now be removed taking care not to dislodge the wire.
Inserting the dilator
Advance the dilator over the guidewire, always maintaining a firm grip on the wire to prevent displacement. Line yourself up so that the dilator can be pushed over the wire with ease. If resistance is felt stop and reassess. Monitor the ECG closely as inadvertent wire advancement may trigger ectopic beats. If the dilator is difficult to advance, consider using serial dilators or make a small incision in the skin at the entry site. Once the tract is adequately dilated, remove the dilator and feed the catheter over the guidewire. When the catheter is correctly positioned withdraw the guidewire.
Checking catheter patency
Using a 10 or 20ml syringe filled with saline, aspirate the line to check that there is blood return. There should be no resistance on flushing. Always use a push pause, positive pressure flush technique[9]. Heparin can be used depending on local policy. Place a needle-free device at the end of each lumen4.
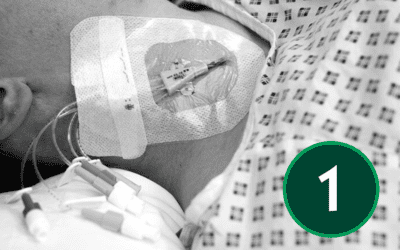
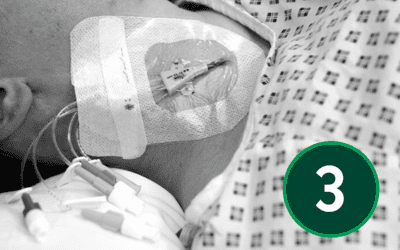
Catheter stabilisation
Follow your Trust’s policy on whether to suture the CVC in place, or use a subcutaneous anchor securement system – see article 7.
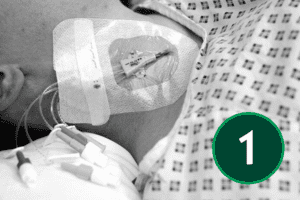
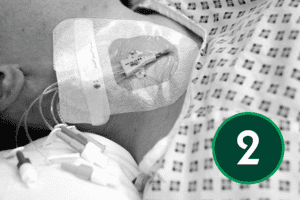
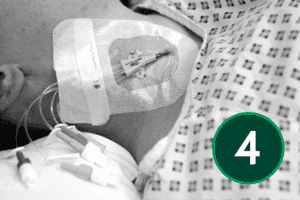
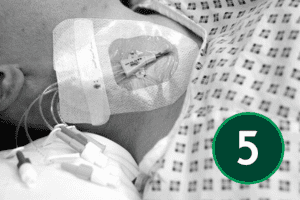
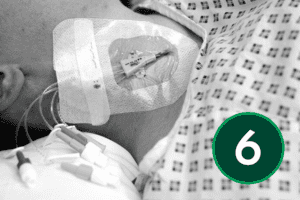
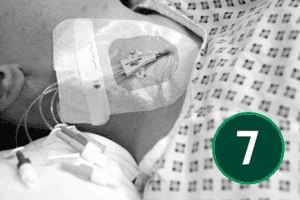
Dressing
Make sure the patient has no allergies to dressings. Apply a gauze dressing to the venous access site if there is oozing present and apply a breathable dressing. Note that the sites may ooze slightly following insertion of the catheter.
Confirmation of tip position
For CVCs inserted in the upper body, the patient will require a chest X-ray to confirm the position of the line. The tip of the line should be in the lower third of the SVC, or right atrium. Be aware that catheter position can change with patient position.
Conclusion
The successful insertion of a central venous catheter relies on a combination of technical proficiency, adherence to evidence-based protocols, and a patient-centred approach. Key procedural elements, including the administration of local anaesthesia, ultrasound-guided vein identification, and the meticulous execution of the Seldinger technique, are essential for minimising risks and ensuring catheter patency. Post-insertion practices such as securement, dressing application, and confirmation of catheter tip placement further contribute to patient safety and procedural success. In summary, CVC insertion demands a high standard of clinical practice, continuous monitoring, and thorough documentation to uphold the quality of care and reduce the incidence of complications.
Continue Reading
- Article 1: Understanding CVCs: Roles, Anatomy, and Device Selection
- Article 2: Preparing for CVC Insertion – Patient Assessment, Consent, and Pain Management
- Article 3: Infection Prevention and Aseptic Techniques

- Article 4: Foundations of Ultrasound Physics and Applications
- Article 5: Central Venous Lines – Insertion Techniques and Pain Management
- Article 6: Navigating Complications in Central Venous Access
- Article 7: Post-Insertion Care, Maintenance and Safe Removal
References
[1] Dougherty, L (2006) Central Venous Access Devices. Care and Management. Blackwell Publishing. Oxford
[2] Alexandrou E, Spencer T, Frost SA, Parr M, Davidson PM, Hillman KM. Establishing a nurse‑led central venous catheter insertion service. J Assoc Vasc Access. 2010;15(1):21‑27.
[3] Moureau, N. Lamperti, M. Kelly, LJ et al. (2013) Evidence – based consensus on the insertion of central venous devices: definition of minimal requirements for training. British Journal of Anaesthesia. 110: 347 – 356
[4] Gorski LA, Hadaway L, Hagle ME, et al. Infusion therapy standards of practice. Home Healthc Now. 2016;39(1 Suppl):S1‑S159.
[5] Bodenham, A. Babu, J. Bennett, J. Binks, R. Fee, P. Fox, B. Johnston, AJ. Klein, AA. Langton, JA. Mclure, H. Tighe, SQM (2016) Safe vascular assess guidelines. Anaesthesia. Available online: doi:10.111/anae.13360
[6] Bodenham, A. Babu, J. Bennett, J. Binks, R. Fee, P. Fox, B. Johnston, AJ. Klein, AA. Langton, JA. Mclure, H. Tighe, SQM (2016) Safe vascular assess guidelines. Anaesthesia. Available online: doi:10.111/anae.13360
[7] National Institute for Clinical Excellence (NICE). Guidance on the use of ultrasound locating devices for placing central venous catheters. Technology Appraisal Guidance No. 49. London: NICE; 2002.
[8] Loveday, H.P., Wilson, J.A., Pratt, R.J., Golsorkhi, M., Tingle, A., Bak, A., Browne, J., Prieto, J. & Wilcox, M. (2014). epic3: National evidence-based guidelines for preventing healthcare-associated infections in NHS hospitals in England. Journal of Hospital Infection, 86(Supplement 1), S1–S70.
[9] Royal College of Nursing. Standards for infusion therapy. 4th ed. London: Royal College of Nursing; 2016.