
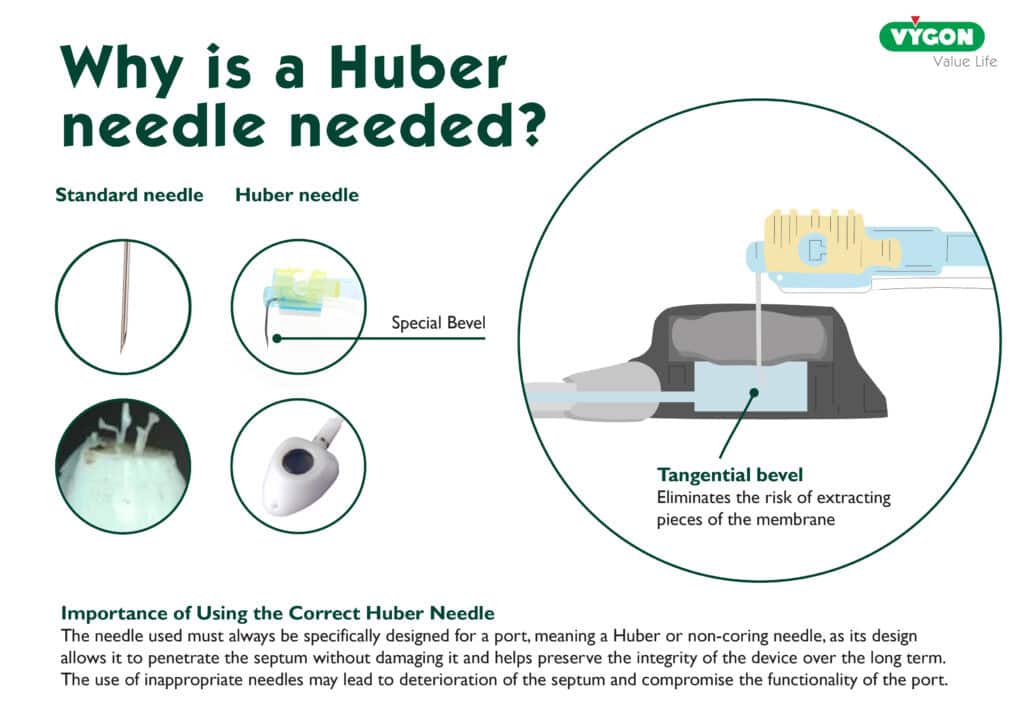
Huber needles, also known as non-coring needles, are specifically designed to access totally implantable venous access devices (TIVADs), commonly referred to as ports. These devices provide long-term central venous access for therapies such as chemotherapy, antibiotics and parenteral nutrition.
Huber needles must be used correctly to preserve port integrity, support effective treatment delivery and minimise complications. Their non-coring design allows repeated access to the device without damaging the silicone septum, helping to maintain long-term function when proper technique is applied.
However, successful outcomes rely on more than the device itself. They depend on precise insertion technique, correct needle placement, effective flushing practices and safe removal.
Design and Purpose of Huber Needles
Huber needles are engineered to access ports through percutaneous insertion via the septum.
Key characteristics include:
- A non-coring beveled tip designed to separate, rather than remove, septum material
- A curved or angled design that allows the needle to sit flat against the skin
- Availability in multiple lengths and gauges to suit patient anatomy
- Integration with safety mechanisms and extension sets in many Vygon devices
Modern Huber needles are designed with integrated safety features to help reduce needlestick injury risk and improve ease of use, including mechanisms that allow safe, single-handed activation.
The combination of implantable ports and non-coring needles provides reliable, repeated vascular access while minimising tissue trauma and supporting long-term vessel health.
Principles of Safe Port Access
Several essential principles underpin the safe use of Huber needles:
- Always use a non-coring needle
- Insert the needle into the centre of the port septum
- Maintain strict aseptic technique
- Confirm successful access with blood reflux and a smooth flush
- Ensure the needle reaches the base of the reservoir without excessive force
Correct technique is critical, as poor positioning can lead to complications such as occlusion, extravasation or ineffective therapy delivery.
Huber Needle Insertion Technique
Preparation is essential for safe insertion:
- Confirm patient identity and obtain informed consent
- Assess the site for redness, swelling or infection
- Prepare a clean, organised working environment
- Perform hand hygiene and apply appropriate PPE
- Clean the skin using a suitable antiseptic and allow to dry
The port septum should be clearly palpated and localised before insertion.
Insertion Procedure
A clear, structured approach should be followed when performing Huber needle insertion:
- Stabilise the port using the non-dominant hand
- Hold the Huber needle securely by the wings
- Insert at a 90-degree angle through the skin and septum
- Advance until the tip rests at the base of the reservoir
- Ensure the puncture is central within the septum
- Confirm placement through blood reflux
- Flush the port using a pulsatile (push-pause) technique
Correct insertion ensures efficient therapy delivery and reduces the risk of mechanical complications.
Bevel Orientation and Flow Optimisation
The orientation of the needle bevel is an important consideration during port access.
- The bevel should face away from the port outlet channel
- This promotes bidirectional flow within the chamber
- Improved flow enhances protein removal and flushing efficiency
Incorrect orientation may reduce flow, increase the risk of occlusion and compromise overall device performance.
PositioningConsiderations
Incorrect needle positioning can lead to complications:
- Too close to the chamber wall
- May reduce flow rate
- Positioned against the septum
- Increases the risk of malfunction or extravasation
Accurate central positioning within the port is therefore essential to ensure optimal device performance and safe therapy delivery.
Flushing and Maintenance
Flushing is a critical element of port care.
- A pulsatile flush is essential to help reduce the risk of occlusion
- Flushing should be carried out using the correct technique and appropriate volume
- Effective flushing helps remove protein deposits and maintain catheter patency
Failure to follow correct flushing protocols is a key contributing factor to catheter occlusion and reduced device function.
Huber Needle Removal (De-accessing)
Preparation, before removal:
- Ensure therapy is complete
- Perform hand hygiene and use appropriate PPE
- Prepare equipment and a clean working area
Removal Technique
Safe removal should follow a clear, structured approach:
- Remove the dressing carefully
- Perform a pulsatile flush prior to removal
- End the flush with positive pressure
- Stabilise the port
- Withdraw the needle smoothly
- Apply a sterile dressing
Maintaining positive pressure during removal is essential to prevent blood reflux into the catheter, which can lead to occlusion.
Positive Pressure Technique
Positive pressure technique is an important part of Huber needle practice, helping to prevent blood from flowing back into the catheter and reducing the risk of occlusion.
It involves maintaining gentle forward pressure on the syringe plunger at the end of a flush, particularly during disconnection or needle removal. This ensures that blood does not reflux into the catheter lumen.
Key principles include:
- Maintaining steady pressure during the final phase of flushing
- Avoiding any pause between flushing and disconnection
- Applying positive pressure as the Huber needle is withdrawn
Using this technique consistently helps maintain catheter patency and supports reliable long-term device function.
Complications Associated with Huber Needle Use
Although safe when used correctly, complications can occur.
Occlusion
- Often linked to poor flushing technique
- Can result from blood reflux or protein build-up
Extravasation
- May occur if the needle is incorrectly positioned
- Associated with significant tissue damage, particularly with vesicant drugs
Infection
- Linked to breaches in aseptic technique
- Can be local or systemic
Device Malfunction
- Often due to incorrect needle placement or bevel orientation
Needlestick Injury
- Risk can be reduced through the use of safety-engineered Huber needles
Understanding and applying correct technique plays a key role in minimising these risks and supporting safe, effective device use.
Training and Competency
Training and competency are essential for the safe use of Huber needles:
- Different Huber needle systems may have varying mechanisms and safety features
- Clinicians should complete device-specific training and competency assessment
- Regular practice is important to maintain skill, confidence and consistency
Competence directly impacts procedural success and reduces the risk of complications.
Conclusion
Huber needles are central to the safe and effective use of implantable ports, supporting long-term vascular access across a range of clinical settings. While the device itself is designed to preserve port integrity, clinical outcomes are highly dependent on technique.
From insertion through to removal, each step must be performed with precision. Small variations in practice, such as bevel orientation, flushing technique or needle positioning, can significantly influence device performance and complication risk.
By following best practice and maintaining a consistent, evidence-based approach, clinicians can optimise port function, reduce complications and deliver safer, more effective patient care.

A place to learn about health procedures and techniques from leading professionals.